


It’s quite often that we use our RaspberryPi for some mobile applications like a robot or vehicle. Connecting LAN will not be a good solution for getting connected to the internet. The WiFi is the best choice if the distance is few meters from an accessible router or modem. You can attach USB WiFi dongle and configure it to connect home network by using the ‘WiFi connection utility’ in Raspbian Desktop or from the shell itself. Now, for that you definitely need a LAN connection. It wont be a good idea if you have to start WiFi manually every time you boot the Raspi. The solution is simply configuring the WiFi connection to start automatically at boot up.
Automatically Connecting Wi-Fi on RaspberryPi is easy. Edit just two files, network configuration and network profile. Let’s start!
Edit the /etc/network/interfaces:
sudo nano /etc/network/interfaces
Edit the file to look like this,
auto lo
iface lo inet loopback
iface eth0 inet dhcp

auto wlan0
allow-hotplug wlan0
iface wlan0 inet dhcp
wpa-roam /etc/wpa_supplicant/wpa_supplicant.conf
iface default inet dhcp
Since, the DHCP Server in your network may give the RaspberryPi different IP address sometimes; it is a good idea to use a Static IP. If you wish to allow the RaspberryPi to use a Static IP, change the file like this,
auto lo
iface lo inet loopback
iface eth0 inet dhcp

auto wlan0
allow-hotplug wlan0
iface wlan0 inet static
address 192.168.2.100 #(Static IP address for your RaspberryPi)
netmask 255.255.255.0
gateway 192.168.2.1 #(IP address of your router)
Change the IP address of both RaspberryPi and Router with yours.
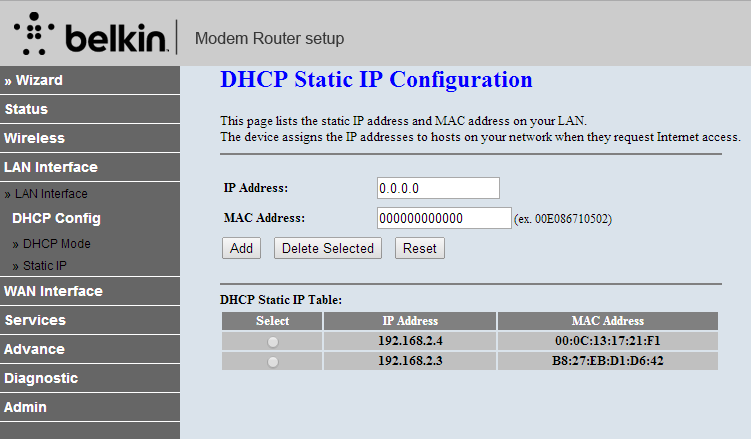
The same can be done in another way also. Get in to your router settings and find the ‘Static IP’ section somewhere in LAN settings. It is difficult to explain the exact procedure here as the routers differs with brands and models. If you could find the settings for the Static IP entry, you’ll need the MAC address of your WiFi dongle or LAN.
Type the below command to see the MAC addresses,
ifconfig

Look for the term HWaddr in eth0 and wlan0 sections. The very next is the MAC address for LAN and WiFi. Copy the MAC address of wlan0, if you want to apply static IP to the WiFi. Create a new entry in your router’s static IP list and enter this MAC address and assign an IP for this MAC address. Whenever, this WiFi dongle tries to connect to the network will get the specified IP only.
 Since the LAN is built into RaspberryPi Board, whenever you try to connect RaspberryPi to the network using the LAN will get the specified Static IP assigned by the router. But, in case of the WiFi dongle it’s different. The MAC address of WiFi is related to the Dongle and thus you can connect it to another RaspberryPi board to get the set Static IP to be available for that new board. That means you can carry the IP address with your WiFi dongle and it works wherever you connect it. It is handy if you deal with several RaspberryPi boards to experiment and still keep a single IP address for any RaspberryPi you purchase. Apply the same strategy for another WiFi dongle and you are good to go with multiple IPs.
Network Settings
Now, add your WiFi parameters to /etc/wpa_supplicant/wpa_supplicant.conf.
sudo nano /etc/wpa_supplicant/wpa_supplicant.conf
Add these lines,
network={
ssid="YOURSSID"
scan_ssid=1
key_mgmt=WPA-PSK
proto=WPA
psk="YOURPASSWORD"
}
proto could be either RSN (WPA2) or WPA (WPA1).
proto could be either RSN (WPA2) or WPA (WPA1).
key_mgmt could be either WPA-PSK (most probably) or WPA-EAP (enterprise networks)
Additionally you can specify these parameters too,
pairwise could be either CCMP (WPA2) or TKIP (WPA1)
auth_alg is most probably OPEN, other options are LEAP and SHARED
At this point, you should be able to start the connection with this command:
sudo ifup wlan0
Connect Wi-Fi Automatically When Booting
To make the connection work when the RaspberryPi boots, add a few lines at the of /etc/rc.local:
sudo nano /etc/rc.local
Add these lines,
echo "Starting WiFi..."
wpa_supplicant -B -i wlan0 -c /etc/wpa_supplicant.conf
sleep .5s
dhclient wlan0
echo "WiFi started"

exit 0
Keep the connection alive
To make sure that the connection stays up, do the below actions.
First, disable the power management of the WiFi dongle. Create a new /etc/modprobe.d/8192cu.conf file with this content:
sudo nano /etc/modprobe.d/8192cu.conf
Edit the line,
options 8192cu rtw_power_mgnt=0 rtw_enusbss=0
Then, make the RaspberryPi ping the router every minute by editing crontab:
crontab -e
and add this line at the end :
*/1 * * * * ping -c 1 192.168.2.1
Replace the IP address by the actual IP address of your router.
Now, reboot your RaspberryPi to check whether the WiFi connects automatically by login to router settings.